Sheet Metal Remnant Management: Stop Letting Offcuts Become Scrap
How to track, store, and reuse sheet metal remnants in your cutting shop. Cost data by shop size and a practical workflow for integrating remnants into nesting jobs.
Every shop I talk to has the same corner. A rack, or a pile, or a stack of partial sheets that got cut once and never touched again. By the time I see them in a photo, some are bent from being stood on edge too long and nobody can say with certainty what material they are without going to look.
That corner is a real dollar figure. Sheet metal remnant management is the practice of making sure that figure gets recovered instead of scrapped.
What a remnant actually is
A remnant is the usable piece of sheet that remains after you finish a nesting job. It’s distinct from the skeleton, which is the grid of material between and around the cut parts. The skeleton goes to the scrap bin. The remnant is large enough to run future jobs on.
How much material ends up as a reusable remnant? A 2020 analysis by Dallan S.p.A., an Italian sheet metal equipment manufacturer, tracked scrap across 10 product types in a production facility and documented a 15.9% average waste rate using traditional sheet-cutting methods. Industry benchmarks from the Fabricators and Manufacturers Association put sheet metal yield between 75 and 90 percent depending on part geometry. The gap between what’s cut and what goes to parts consistently includes 15–25% of each sheet’s area that qualifies as a reusable offcut.
The catch is that a remnant only has value if you actually reuse it.
What untracked sheet metal remnants cost per year
The table and chart below show the annual value sitting in sheet remnants, and how much of it shops recover under three different tracking approaches. The model uses a 20% remnant fraction (the share of each sheet that becomes a reusable offcut), a 12% reuse rate with no system, a 30% reuse rate with a spreadsheet, and a 60% reuse rate with integrated nesting software tracking.
| Shop size | Remnant pool/yr | No system | Spreadsheet | Nesting software |
|---|---|---|---|---|
| Small (40 sheets/mo, $100 avg) | $9,600 | $1,152 | $2,880 | $5,760 |
| Medium (120 sheets/mo, $150 avg) | $43,200 | $5,184 | $12,960 | $25,920 |
| Large (350 sheets/mo, $175 avg) | $147,000 | $17,640 | $44,100 | $88,200 |
| High-volume (800 sheets/mo, $200 avg) | $384,000 | $46,080 | $115,200 | $230,400 |
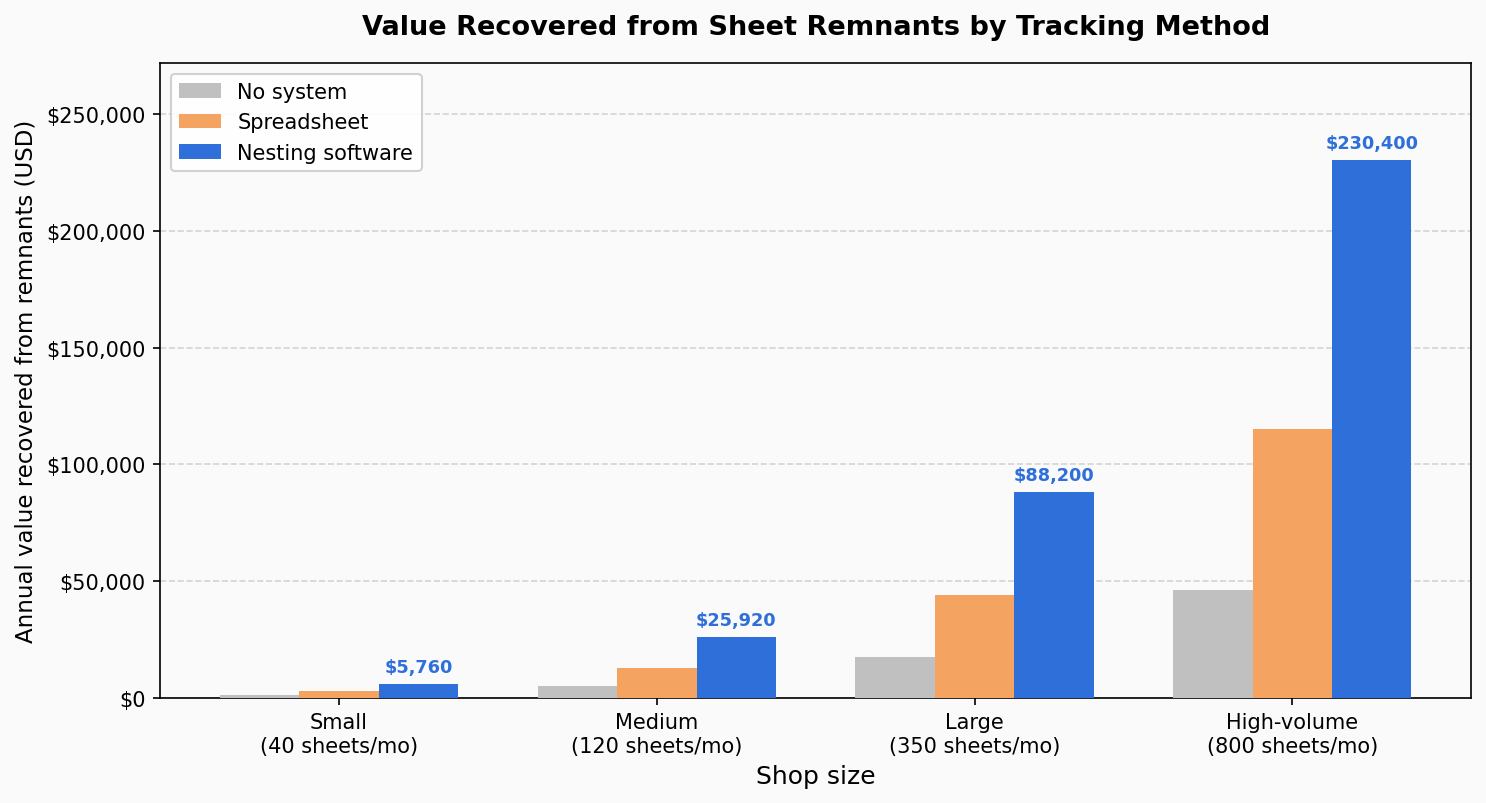
For a medium shop cutting 120 sheets a month at $150 each, the difference between no system and integrated software is roughly $20,000 per year. That’s material already paid for and then discarded. Mayank Patel, R&D Head at SLTL Group, put the same point directly in a February 2026 analysis: manufacturers operating without smart nesting could be losing up to 20% in material cost every month.
What happens in most shops without a system
Without a formal workflow, the remnant lifecycle usually goes like this. The operator finishes a job, cuts off the remnant, and leans it against the rack. If the remnant has no label, nobody knows what material it is a week later. When a small job comes in that could run on a remnant, the programmer nests on a new full sheet because there’s no reliable way to query what’s on the rack. After a few months the rack fills up, anything small or bent gets moved to the scrap bin to clear floor space, and the cycle repeats.
The cost of adding a new sheet when a remnant would have worked is the full sheet price, not a marginal difference. Purchasing, receiving, stocking, and handling all carry time. For a job that needs 600x900mm of material, buying a $150 full sheet and generating another remnant compounds the problem rather than resolving it.
Remnant lifecycle in a well-run shop
Here’s the workflow when remnant management is working:
flowchart TD
    A[Job complete] --> B{Usable offcut remaining?}
    B -- No --> C[Skeleton to scrap bin]
    B -- Yes --> D[Measure and record remnant dimensions]
    D --> E[Label: material grade, thickness, dimensions, date]
    E --> F[Store in indexed vertical rack]
    F --> G{New job queued}
    G --> H[Check remnant inventory first]
    H -- Match found --> I[Nest job onto remnant]
    H -- No match --> J[Pull full sheet from stock]
    I --> K[Cut job, remove remnant from inventory]
    J --> B
The key step is H: check remnant inventory before pulling new material. If your nesting software stores remnant profiles and checks them automatically against incoming jobs, this happens without the programmer leaving their workstation. If the software can’t do this, the check still needs to happen, just manually.
Why spreadsheets fail at this
Most shops that try to track remnants start with a spreadsheet. It works for 20 or 30 pieces. Once you have 80 remnants across different materials, thicknesses, and irregular dimensions, it breaks down for three reasons.
The data is never current. Someone uses a remnant and doesn’t update the sheet. Someone measures incorrectly when adding a new entry. The spreadsheet shows “available” for material that’s already been cut.
It doesn’t connect to the nesting workflow. The programmer has nesting software open in one window and the spreadsheet in another, and checking it becomes an optional extra step that gets skipped under production pressure.
It can’t represent irregular geometry. A remnant after a typical nest isn’t always a rectangle. If your nesting ran down one side of a sheet and left an L-shaped offcut, a cell with “1200 x 400” doesn’t capture that shape accurately. You’ll either find out the true dimensions at the machine or you’ll be conservative and waste the difference.
How nesting software handles remnant management
In nesting software with proper remnant support, the remnant profile is stored as geometry rather than a bounding box. When you finish a job, the software reads the cut boundary and generates the actual remaining outline. That shape gets stored in the material library with grade, thickness, and location.
When you start a new job, the software checks whether any stored remnant can accommodate the parts before allocating a full sheet. This is the reuse-first principle: use paid-for material before buying new material. Shops using this consistently hit 50–65% remnant reuse rates, compared to 10–15% in shops without a system.
Lapas keeps a plate inventory by material, thickness and size. When you consume a finished job, its sheets come out of stock and what is left of each sheet can be kept as a remnant line in its real shape, L-shapes included, carrying the heat number of the plate it came from. When you set up the next job, Lapas suggests the stored remnants that fit its parts, and you add the ones you want. Nesting onto a shaped remnant uses its real outline, so no part is placed on metal that was cut away. Remnants entered by hand are rectangles. Shops that need the cut that frees a remnant programmed, or stock written back into an ERP, still need a dedicated CAM system with integrated material management. See sheet inventory and remnants in Lapas for the full behaviour, including what it does not do.
Tracking method comparison
| Approach | Setup effort | Inventory accuracy | Integrates with nesting | Handles irregular shapes |
|---|---|---|---|---|
| No system | None | N/A | No | N/A |
| Physical label on rack | Low | Medium | No | No |
| Spreadsheet | Low-medium | Low | No | No |
| Custom sheet in nesting software | Low | High | Yes | Yes (manual) |
| Integrated CAM material library | High | High | Yes | Yes (automatic) |
The “custom sheet in nesting software” row is the middle path most shops can implement today without a system change.
Related reading
For the cost-per-job view of material waste, the material waste cost calculator walks through exactly what poor utilization costs per month and where the biggest savings opportunities appear by shop size.
The biggest single factor in remnant size is how efficiently the initial nest was built. Material utilization rate benchmarks gives you the reference numbers for what your shop should be hitting, which directly determines how much reusable offcut you generate per sheet.
FAQ
What is a sheet metal remnant? A remnant is the usable piece of sheet material left over after a nesting job is cut. It’s large enough to use for future jobs, as opposed to the skeleton (the grid of material between and around cut parts), which goes to scrap.
How do I know if a remnant is worth saving? A practical threshold: if the piece is larger than your smallest typical part and the material value exceeds your handling cost for storing and retrieving it, save it. For steel or aluminum at $100–300 per full sheet, any offcut larger than 300x300mm is worth tracking.
Can I nest onto a remnant that isn’t rectangular? Yes, if your nesting software allows custom sheet dimensions or shapes. In Lapas, a remnant kept from a consumed job keeps its real shape, and the next nest uses that outline. A remnant you enter by hand is a rectangle, so for an irregular offcut that did not come out of a Lapas job, enter the largest rectangle that fits inside it. Purpose-built CAM systems can import the exact remnant boundary from the cut file.
How do shops physically store remnants? The standard is a vertical A-frame rack or a slot rack with dividers, organized by material type and thickness. Horizontal stacking makes pieces hard to retrieve without moving others and risks bending thin material. Each piece should carry a physical label that matches its entry in your inventory or nesting system.
How much can a shop realistically recover through better remnant management? The calculations in this post put a medium shop (120 sheets/month, $150 average sheet cost) at roughly $20,000 per year in additional recovery by moving from no system to integrated software tracking. A large shop at 350 sheets per month is in the $50,000–70,000 range. Even the step from no system to a manual custom-sheet workflow captures a meaningful share of that before any software investment.
Remnants only help if the nester can target them. Sheet metal nesting in Lapas keeps your remnants in stock and suggests them when you set up the next job that fits.